How to create orders with CSV import
Fulfill order easily with CSV import
📌 For a step-by-step visual guide, please watch our tutorial video below:
To fulfill using CSV with Dreamship, you use one of the following two ways:
-
Item Variant CSV Template - CSV basic format, applicable to all order types.
-
Product Variant CSV Template- CSV for orders containing products created on the Dreamship app
and follow the instructions below:
(note: copy the template to another google sheet dedicated to your orders for easy follow up)
An notate for columns in CSV:
-
Each row in the CSV represents a line item in the order.
-
Order Reference ID (required) is the order ID from your internal management system/marketplace. Line Items with the same Order Reference ID will be created together in an order. This ID used for each order must be unique to avoid duplicate orders.
-
Line Item Reference ID (optional) is a unique ID for each item in the order, this field can be omitted.
-
Quantity (required) is the quantity that the customer orders for each item
-
All customer information and address columns are required. For the Country field, please use the country code to fill it out correctly. (Example: United States has Country code of US; United Kingdom has Country code of GB)
-
Shipping Method (optional): leave it blank and the system will automatically choose economy or enter express if you need to choose fast shipping.
-
Skip Verification (optional) - Skip the address verification feature on the Dreamship app. You only enter TRUE when the system cannot verify the shipping address. Dreamship is not responsible for shipping problems (incorrect address, delivery over time commitment, etc.) with Skip Verification selected orders.
-
Shop Key (optional) create an order for your Shop, get the Shop Key at the Shop
-
VAT Number (optional) enter VAT number for UK address or IOSS number for EU address
-
VAT Currency (optional) is the currency for the Vat Unit Value, which can be GBP or EUR
-
VAT Unit Value (optional) the amount paid by the customer for each item in the order, this number can be multiplied by the number of products included in the order
- Rush production (optional): To add the rush production feature on the Dreamship app. Enter "TRUE" when you want to apply rush production for the item.
Detailed instructions for creating orders using CSV
Step 1: Prepare CSV file
To fill in the CSV information for each template:
-
Product Variant Method (CSV for orders containing products created on the Dreamship app)
-
Item Variant Method (basic CSV applies to all orders)
-
Item Variant ID: go to each product type on the Dreamship app to fill in the correct Item Variant ID corresponding to the SKU you need to fulfill (Ex: Standard T Shirt white 3XL with ID 316)

-
Print Area Key (required): Go to each product type on the Dreamship app to enter the correct Print Area Key (in the template section). (Example: Standard T Shirt with Print Area Key as front or back)

-
-
-
An Artwork URL column needs to be filled in for each existing Print Area Key
-
We recommend using Amazon AWS or Google Cloud Storage
-
Do not use Google Drive because the link or error leads to failed CSV file download
-
The designs should be designed according to the template found in the catalog. Exact dimensions for each product can be found in the Print Areas section of the Catalog page. For options that are not properly sized, the Resize option needs to be corrected.
-
-
- Resize (required in case the uploaded design is not the required size)
-
If the design you did the right template: do not need to fill in this section.
-
This Fit option ensures the print file fits inside the print area - all details of the design will be displayed on the printed product. However, choosing fit also means that the final product may include spaces
-
Fill the fill option ensures there is no white area and will fill the print area. However, choosing fill can lose detail in your original design
-
Position (optional): this is an advanced option when you want to push the design to one of the edges of the print area, you do not choose resize when you want to use this feature
-
top_left
-
top_center
-
top_right
-
center_left
-
center_center
-
center_right
-
bottom_left
-
bottom_center
-
bottom_right
-
-
Test Order (optional): enter TRUE when you want to create a test order without paying fees or sending it to production.
Step 2: Upload the CSV file to the Dreamship app
-
Go to the Dreamship app.
-
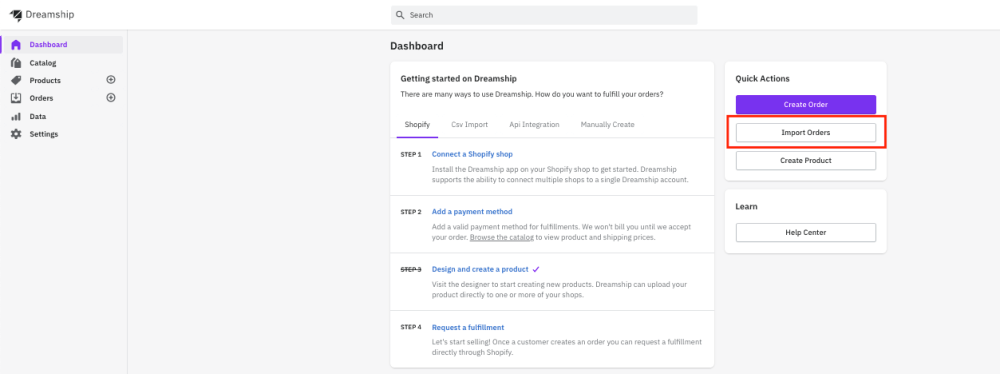
At the Dashboard screen, select Import orders >> Upload CSV >> Download the CSV file you just filled in (remember to save the file's format as .csv).

Your order will be initialized after successful loading. If you encounter an error, please refer to the article Common CSV errors and how to fix them.
Please contact Dreamship or the live chat channel on the bottom right of the screen if you need assistance when uploading CSV for the first time! We will double check the information and make sure your order is error free.
